Socket Programming Using C# and the .Net Framework
In this tutorial, we will create a simple server app and client app that will communicate with each other using TCP.
Our process flow will use the following steps:
- The server will run and start listening for connections.
- The client will connect to the server and send a message.
- The server will receive and display the message from client.
- The server will respond with its own message and then close the connection.
- The client will receive the server's reponse and display it on the UI.
Part 1: Creating the Server Application
Step 1
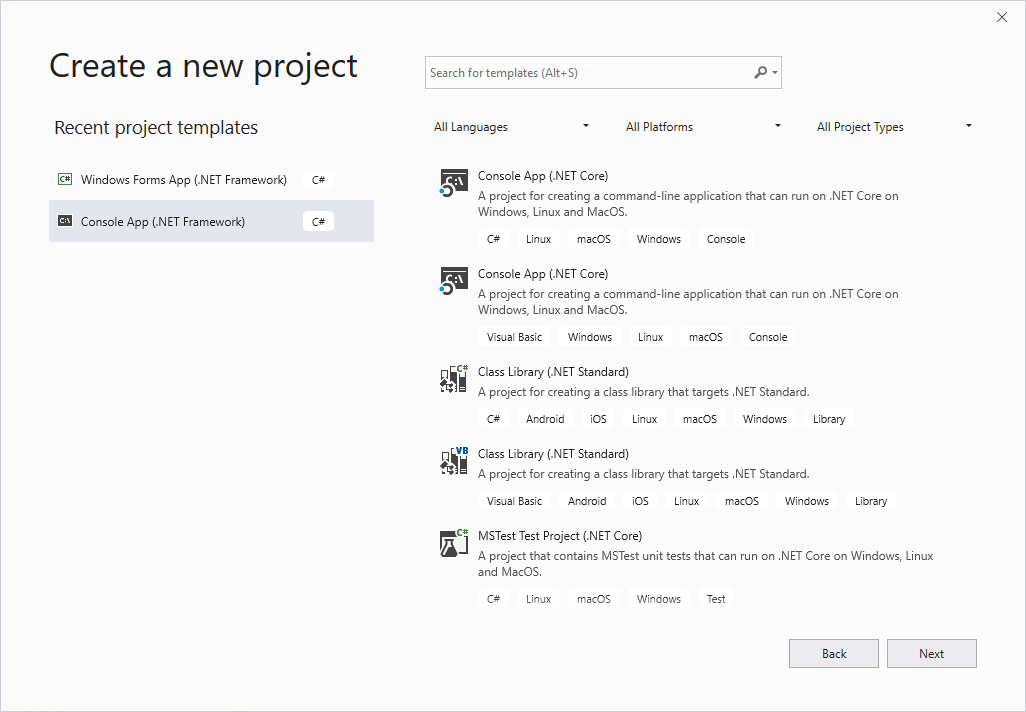
Create a new Console App (.NET Framework) project in Visual Studio.
Step 2
Open the Program.cs file and add the following lines near the top.
using System.Net;
using System.Net.Sockets;
This will let us use the System.Net and System.Net.Sockets classes in such a way that we don't have to type the namespaces in our code.
Step 3
Add the following lines of code inside the static void Main() method.
IPAddress ipAddress = IPAddress.Parse("127.0.0.1");
IPEndPoint ipEndPoint = new IPEndPoint(ipAddress, 55555);
These lines will create an IPAddress object and IPEndpoint object with an IP address of 127.0.0.1 and a port number of 55555. For now, we will be using the loopback address as the server address to make it easy for us to test the application later. You can change this later if you want to test this on a real network. Also note that the 55555 is just an arbitrary port number. Feel free to use any unused port number on your machine.
Step 4
Add the following lines after the lines in Step 3.
Socket connectionSocket = new Socket(AddressFamily.InterNetwork, SocketType.Stream, ProtocolType.Tcp);
connectionSocket.Bind(ipEndPoint);
connectionSocket.Listen(10);

Console.WriteLine(ipEndPoint.ToString() + ": Waiting for clients...");
The first line in this section instantiates a new socket. The new socket is specified to be a Stream socket that uses TCP as the transport protocol and uses the Internet (InterNetwork) as the network protocol.
The second line binds the IP address and port we specified in Step 3 to the socket we instantiated.
The third line tells the socket to listen for any connection attempts and have up to 10 connections in the listening queue.
Note that the socket we created will only be used for listening to connection requests, hence the name "connectionSocket". We will use a different socket for sending and receiving messages and it will be created on the next step.
Step 5
Create the try-catch block in the code below after the code in Step 4.
try
{
	Socket messageSocket = connectionSocket.Accept();
	string clientAddress = messageSocket.RemoteEndPoint.ToString();

}
catch (Exception ex)
{
	Console.WriteLine(ex.ToString());
}
The above code will accept the first connection in the listening queue of the connection socket and instantiate a brand new socket that we can use for communicating with the client on the connection we accepted.
We can get the address of the client by accessing the RemoteEndpoint property of the newly created socket.
Step 6
Inside the try-catch block right at the end, add the following code.
do
{
	byte[] buffer = new byte[1000];
	int numberOfBytesReceived = messageSocket.Receive(buffer);

	string message = Encoding.UTF8.GetString(buffer, 0, numberOfBytesReceived);

	Console.WriteLine(clientAddress + " said: " + message);
} while (messageSocket.Available > 0);
The code above uses a do-while loop to process messages from the socket until we can no longer read messages from the stream. In the first step of the process, we create a byte array called buffer and then use that to receive the data from the socket. We then convert the data from the buffer into a UTF-8 encoded string and display it on the screen.
Step 7
Add the following code after the do-while loop.
string response = "Congratulations! You have mastered socket programming.";
messageSocket.Send(Encoding.UTF8.GetBytes(response));

messageSocket.Shutdown(SocketShutdown.Both);
messageSocket.Close();
In this code, we create a string response message and convert it to a byte array and use the send() method of our socket to send it to the client. To simplify the program, we immediately shutdown and close the socket after sending the message.
Step 8
Finally, add the following lines at the end, after the catch block.
Console.WriteLine();
Console.WriteLine("Press ENTER to continue...");
Console.Read();
This code will prevent the console window from immediately closing after the program ends.
Part 2: Creating the Client Application
Step 1
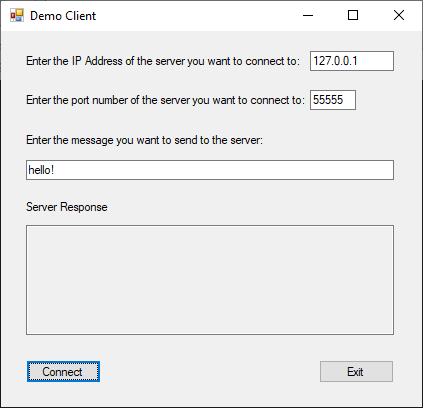
In the same solution as our server application in Visual Studio, create a new Windows Forms application with a user interface similar to the image below.
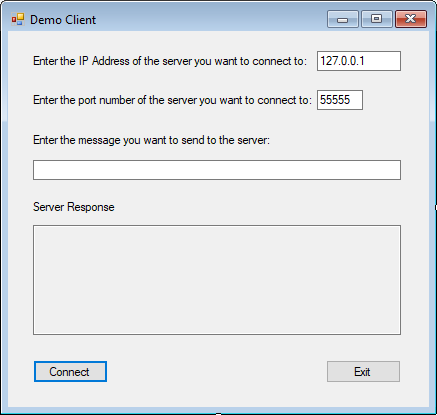
Name the "Connect" button as btnConnect and the textboxes as txtIpAddress, txtPort, txtMessage and txtResponse.
Step 2
Add the following code to the click event handler of btnConnect.
if (!IPAddress.TryParse(txtIpAddress.Text, out IPAddress ipAddress))
{
	MessageBox.Show("Please enter a valid IP Address.");
}
else if (!int.TryParse(txtPort.Text, out int port) || port < 1 || port > 65535)
{
	MessageBox.Show("Please enter a valid port number.");
}
else if (txtMessage.Text == string.Empty)
{
	MessageBox.Show("Please enter a message to send to the server.");
}
else
{
	Socket socket = new Socket(AddressFamily.InterNetwork, SocketType.Stream, ProtocolType.Tcp);
	socket.Connect(new IPEndPoint(ipAddress, port));

	byte[] buffer = Encoding.UTF8.GetBytes(txtMessage.Text);

	socket.Send(buffer);

	do
	{
		int numberOfBytesReceived = socket.Receive(buffer);

		string message = Encoding.UTF8.GetString(buffer, 0, numberOfBytesReceived);

		txtResponse.AppendText(message);

	} while (socket.Available > 0);

	txtResponse.AppendText(Environment.NewLine);

}
The above code first validates user input and then creates a socket similar to how we did it in the server application. Instead of binding into an IP address and port, we directly call the socket's connect() method and specify the IP address and port number we want to connect to. The connect() method also automatically assigns the local machine's IP address to the socket and finds an unused ethereal port for the socket to use.
After connecting to the server, we send a message the same way we did in the server application. Then we also create a loop similar to what we did in the server app for reading data from the socket and converting the data into a UTF-8 encoded string. We then display the string containing the server's response by appending it to the contents of the txtResponse textbox.
Part 3: Putting It All Together
Step 1
Run both the server app and the client app at the same time. If the client and server apps are in the same solution, you can easily do this by setting multiple startup projects in your solution.
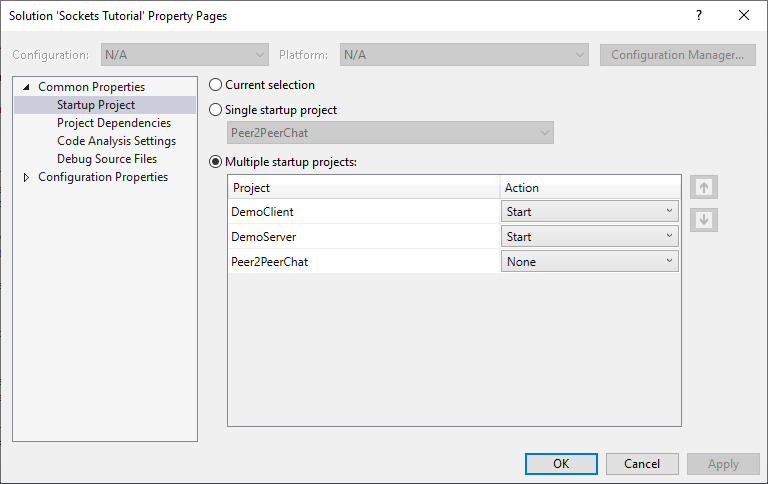
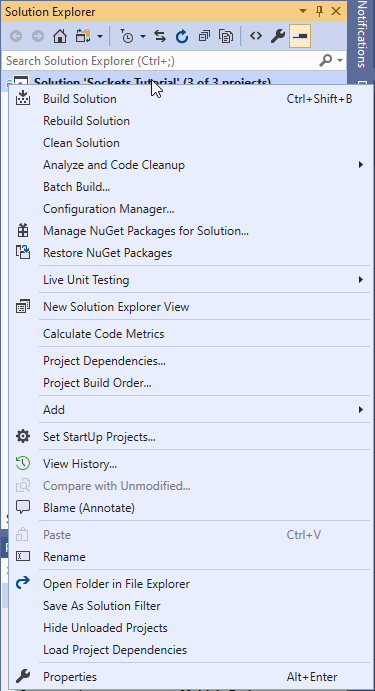
To get to the Solution Property Pages dialog, right-click on the solution in the Solution Explorer and click on "Set Startup Projects..."
Step 2
Fill in the server IP address and port number on the client app. Enter your message in the textbox then click on the "Connect" button.
Step 3
If everything goes well, you should be able to see the client's message on the server app and the server's response in the output textbox on the client app.
If you're having any issues, you can compare your client and server code to the DemoServer and DemoClient projects that you can download from https://github.com/marcvaldez/Socket-Programming-Tutorial.
Challenge
Try implementing the following improvements to the client and server apps to practice your socket programming skills:
- Add a "Disconnect" button to client app and make the client and server continue exchanging messages until the "Disconnect" button is clicked.
- Modify the server app to make it able to connect to multiple clients.
- Convert the client app into a peer-to-peer chat program by adding some of the server code to the client. (A working peer-to-peer chat program can be downloaded from https://github.com/marcvaldez/Socket-Programming-Tutorial.)